Python Programming Language
Get Started with Python, IPython, and JupyterLab using the uv package manager.


Python, created by Guido van Rossum in 1991, is a widely used programming language praised for its simplicity, readability, and versatility. Its clean syntax makes it easier to read and write code compared to languages like C, C++, or Rust.
Python is powerful for a wide range of applications. It includes extensive libraries that make it ideal for projects in data analysis, web development, and machine learning.
Popular platforms like YouTube, Instagram, and Dropbox have been developed using Python, showcasing its ability to handle complex, large-scale systems. Its versatility and ease of use also make it a preferred choice for scientific computing, automation, and artificial intelligence projects.
Python Installation and Considerations
To start your learning journey, install Python on macOS, Linux, or Windows.
There are many ways to install Python, but I recommend using the uv package manager for the best experience. Other options like conda, pyenv, or the official installers from Python.org are reliable and effective but may become limiting as your Python expertise grows.
For now, don't worry about the details! Relax and focus on learning as much as you can about Python. Remember, everything is reversible and can be changed. If you prefer using conda or pyenv, feel free to experiment, that's perfectly fine.
Just know that uv will help you with tasks like:
- Installing specific Python versions
- Creating and managing virtual environments
- Installing and managing Python packages and tools
- Replacing several tools like conda, pyenv, pip, poetry, virtualenv, and more
Python Installation with uv
The steps for installing uv and running Python code can seem intimidating if you're not familiar with using the terminal. Don't worry! To navigate this process without stress, I recommend that you always read the messages that appear after you run any commands.
There's often useful information or instructions provided, simply follow them or do a quick online search, and you may be surprised at how quickly you can find solutions to common problems.
1 - Installing uv
To install uv, open the Terminal or PowerShell and paste the following code.
macOS and Linux:
curl -LsSf https://astral.sh/uv/install.sh | shWindows:
powershell -ExecutionPolicy ByPass -c `
"irm https://astral.sh/uv/install.ps1 | iex"2 - Installing Python
Once we've installed uv, we're ready to install Python!
Enter the following code in the Terminal or PowerShell:
uv python installInstallation complete! The adventure begins now!
Running Python Code
Python provides several tools and environments for writing and executing code, each suited to different needs.
We'll explore three methods for running Python code: the Python interpreter for immediate feedback, IPython for interactive coding experience, and JupyterLab for developing complex and interactive projects.
Future courses will include advanced configurations using tools such as VS Code and virtual environments with uv.
The Python Interpreter
The Python interpreter is the simplest way to execute Python code. It allows you to run commands line by line and is ideal for quick testing and simple scripts. The Python interpreter is included with Python installations and can be started from your command line.
1 - Launching the Python Interpreter
To start Python, enter the following command in the Terminal or PowerShell:
uv run pythonYou'll see something like this:
uv run python

Python 3.13.5 (main, Jul 1 2025, 18:16:22)
Type "help", "credits" or "license" for more information.

>>>
2 - Hello, world!
Tradition suggests that the first program in a new language should print the words "Hello, world!" on the screen.
In Python, this can be done in a single line:
print("Hello, world!")Type it into the Python interpreter, and you should see the following output:
uv run python

Python 3.13.5 (main, Jul 1 2025, 18:16:22)
Type "help", "credits" or "license" for more information.

>>> print("Hello, world!")
Hello, world!
Try calculating the sum of the first 5 natural numbers:
1 + 2 + 3 + 4 + 5You should see the following output:
uv run python

Python 3.13.5 (main, Jul 1 2025, 18:16:22)
Type "help", "credits" or "license" for more information.

>>> print("Hello, world!")
Hello, world!

>>> 1 + 2 + 3 + 4 + 5
15
The IPython Interpreter
IPython is a powerful interactive Python shell that provides a rich environment for data exploration, experimentation, and visualisation. It offers features like code completion, syntax highlighting, and the ability to execute code line by line. It is great for interactive learning and experimentation.
1 - Installing IPython
To install IPython using uv (see the previous section), enter the following command in the Terminal or PowerShell:
uv tool install ipython --with pipTo complete the setup, update your shell PATH with this command:
uv tool update-shell2 - Launching the IPython Interpreter
To start IPython, use the following command:
ipythonYou'll see something like this:
ipython

Python 3.13.5 (main, Jul 1 2025, 18:16:22)
IPython 9.4.0 -- An enhanced Interactive Python.

In [1]:
3 - Exploring Tab Completion
Remember the classic "Hello, world!"? It's a great start, but let's dive into something more practical: IPython's tab completion.
IPython's tab completion helps you gain efficiency by letting you complete code with just a tap of the Tab key. This simple action reduces typos and saves time.
For instance, if you want to type print, start by entering pr in the IPython interpreter and press Tab. Instantly, a list of options starting with pr will appear:
In [1]: pr
          print() property %precision %prun
Select print() and complete the "Hello, world!" example:
In [1]: print("Hello, world!")
Hello, world!

In [2]:
4 - Discovering Object Attribute Completion
Imagine you're building a Lego castle. Each Lego brick is an object, and come in different shapes and colors, these are like the attributes of an object. Attributes describe what an object is, such as its color, size, or shape.
To build your castle, you also need to know what each Lego brick can do. For example, some bricks can snap together, while others might have special hinges. In Python, these actions are called methods. Methods tell you what an object can do, such as adding, removing, or changing things.
IPython's object attribute completion is a handy tool that helps you easily discover the attributes and methods an object has.
For example, if you have a list of Lego pieces:
In [2]: legos = ['brick', 'hinge', 'plate']

In [3]:
When you type legos. and press the Tab, IPython will show a list of attributes and methods available for the legos list:
In [3]: legos.
              append() count() insert() reverse()
This way, you can quickly see what you can do with the legos list without having to remember everything.
Saves time: No more Googling for specific methods or attributes
Reduces errors: Autocompletion minimizes typos and mistakes
Enhances learning: Discover object capabilities faster
The JupyterLab
JupyterLab is a web application for creating interactive documents that combine code, text, equations, and rich visuals. It provides Python learners with an intuitive environment for coding and experimentation.
1 - Installing JupyterLab
To install JupyterLab, enter the following command in the Terminal:
uv tool install jupyterlab --with altairThis will install JupyterLab with the Altair extension that allows us to create interactive visualizations.
2 - Launching JupyterLab
Launch JupyterLab with:
jupyter-labThis will launch the JupyterLab server and automatically open it in your web browser, as shown in the image below.
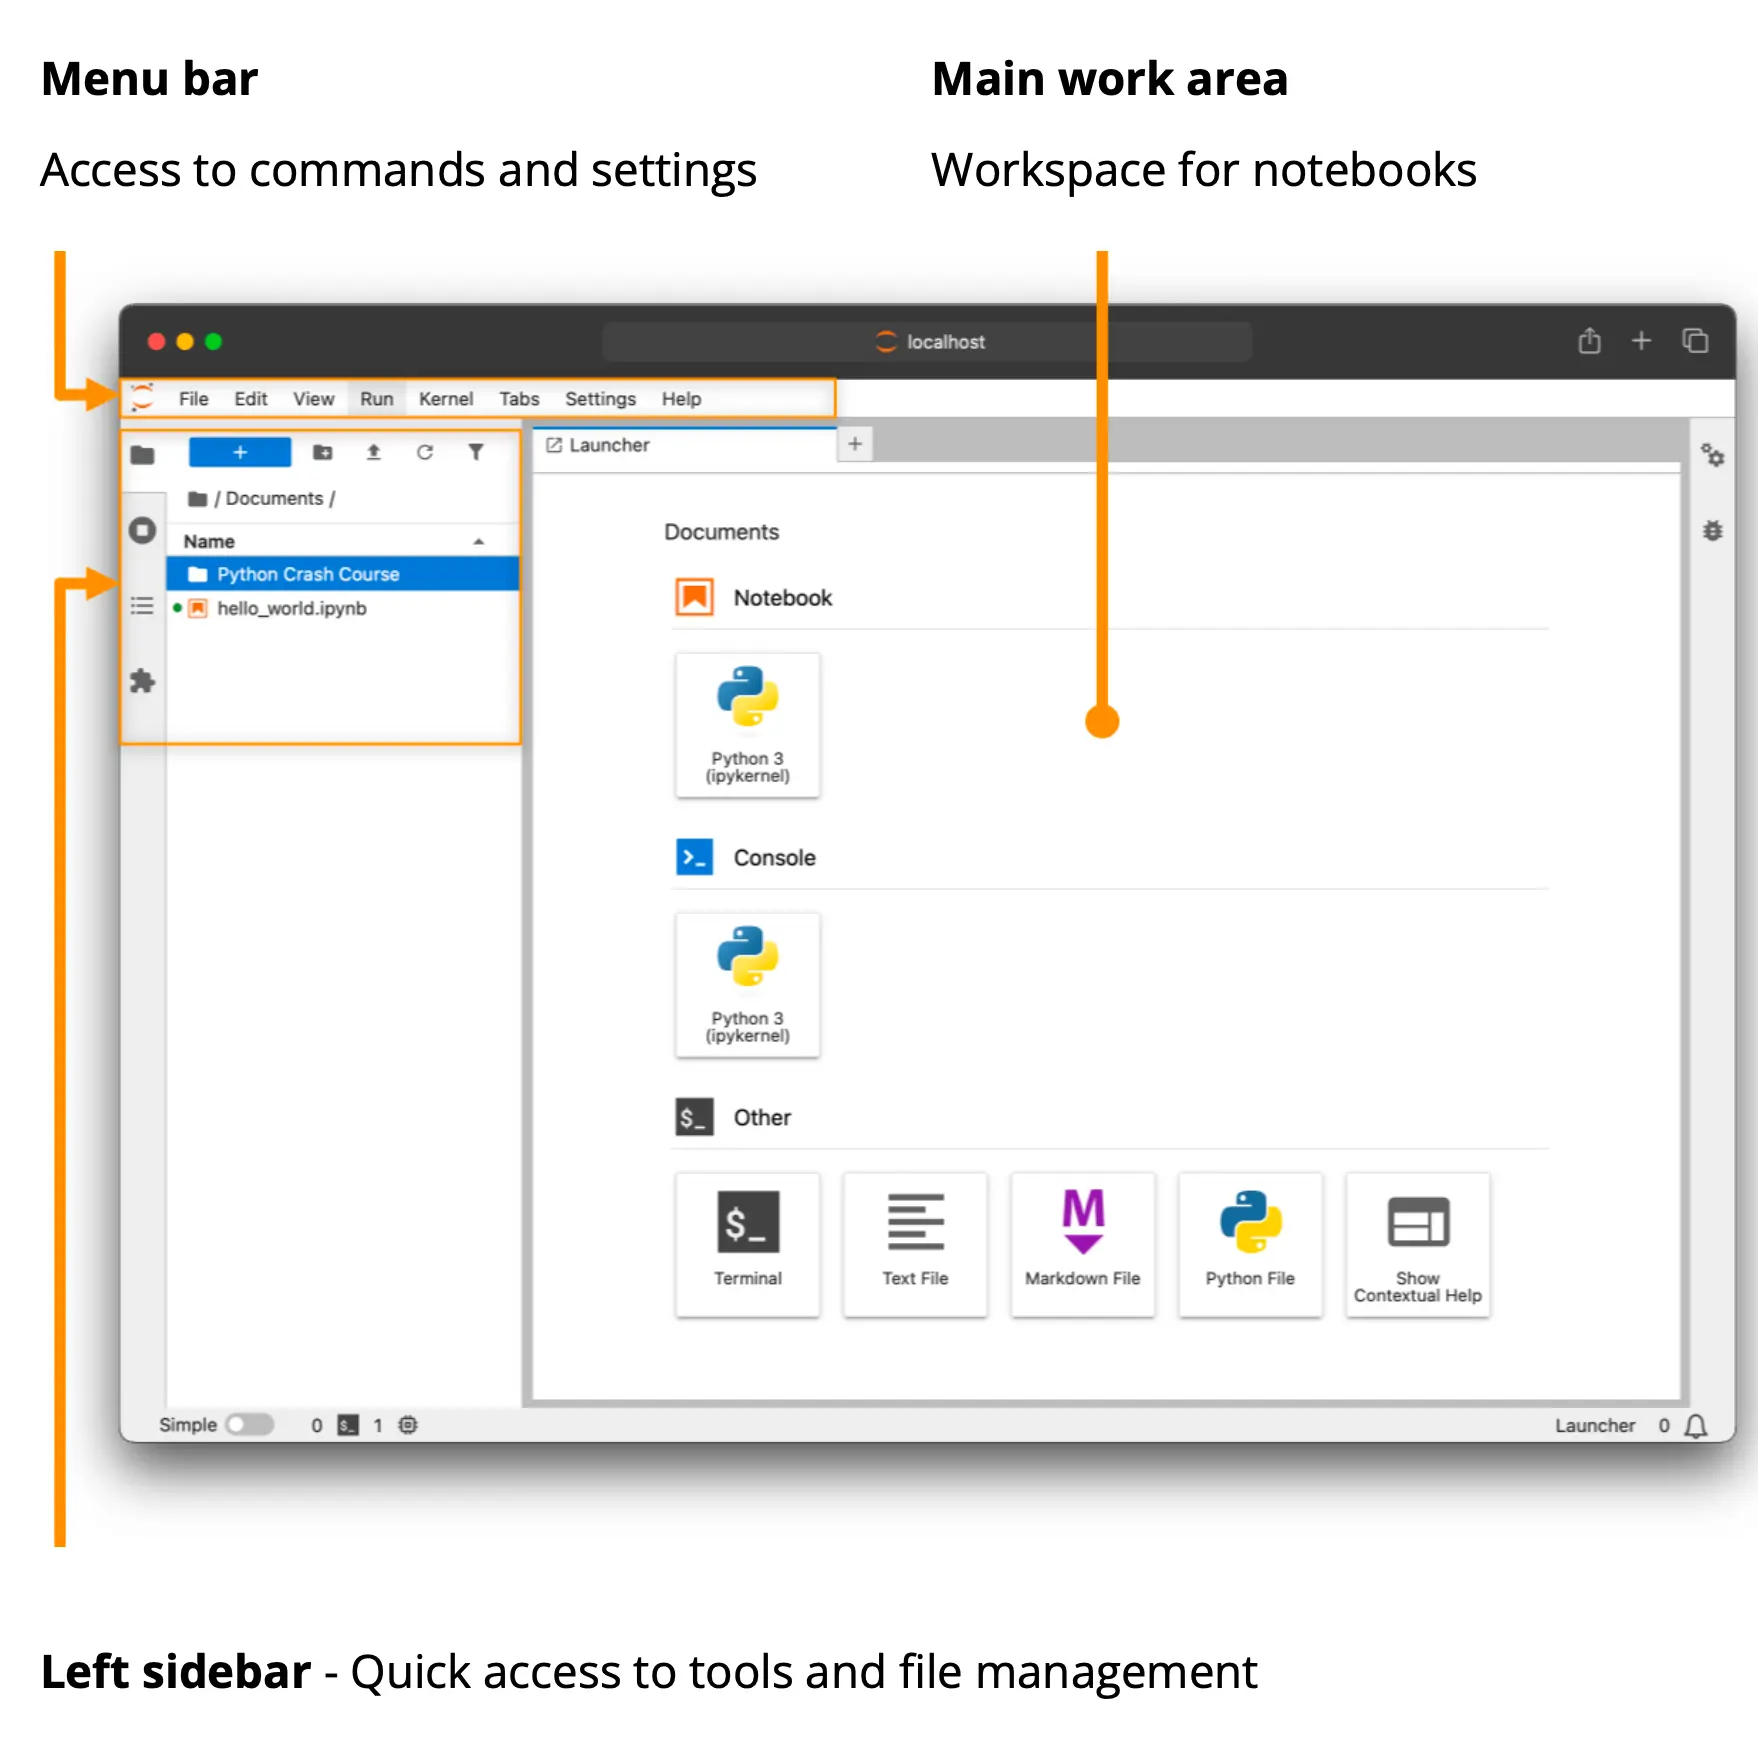
3 - Exploring JupyterLab
In our previous tutorial, we covered the fundamentals of IPython including tab completion and object attribute completion. Now, let's explore similar features with JupyterLab.
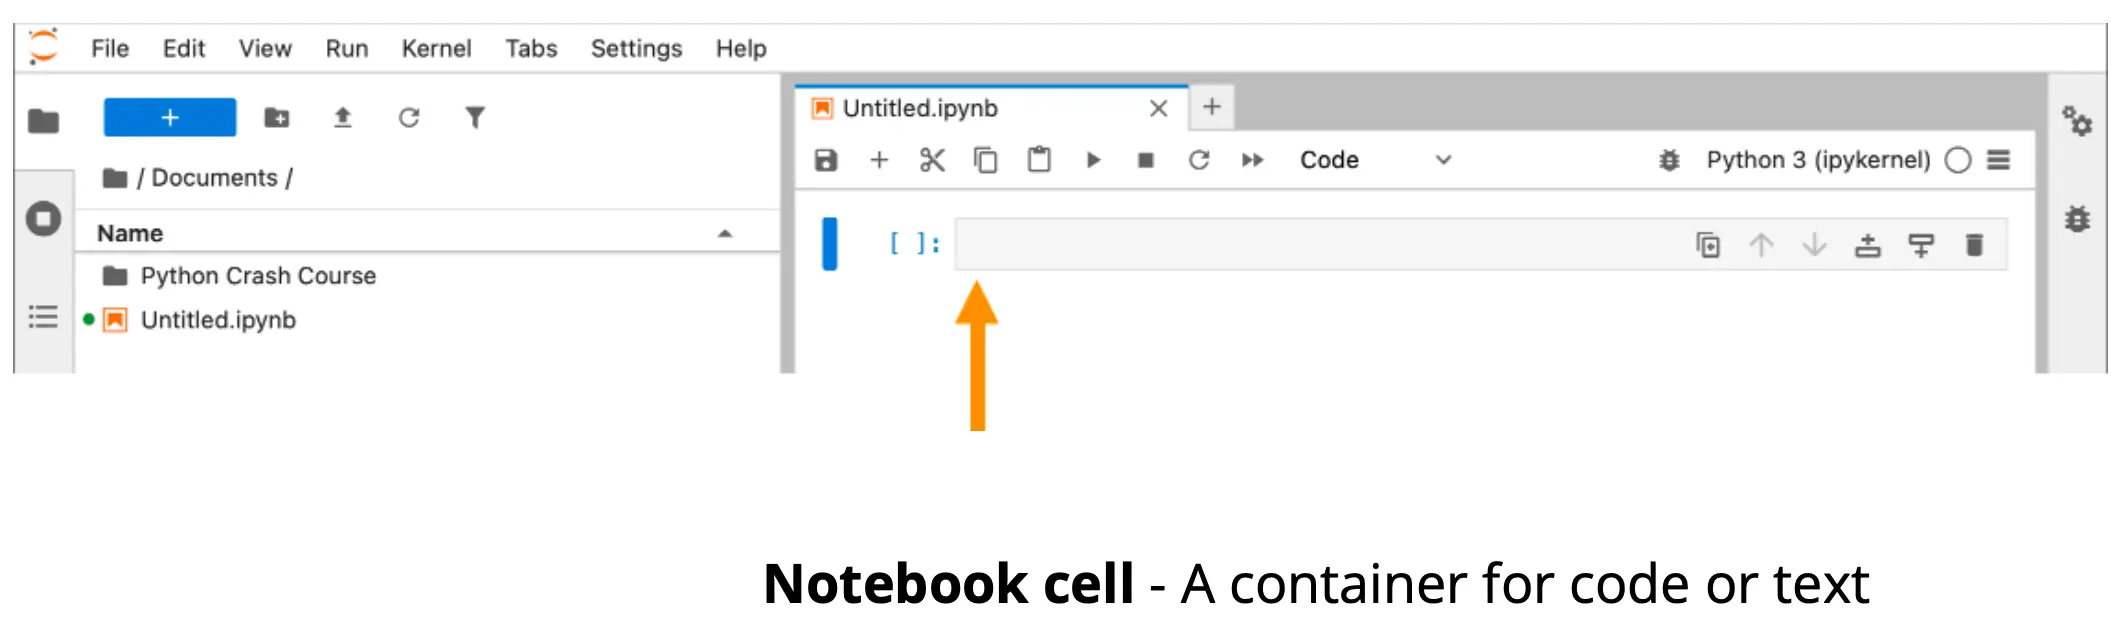
In the menu bar, go to File, click New, and select Notebook. Choose Python 3 as the kernel. A window similar to this will appear:
JupyterLab tab completion works like IPython. Start typing pr in a notebook cell and press Tab to see options:
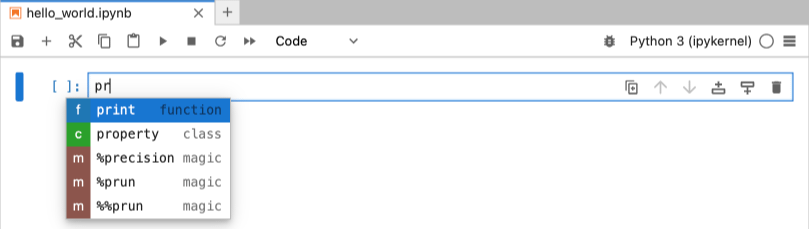
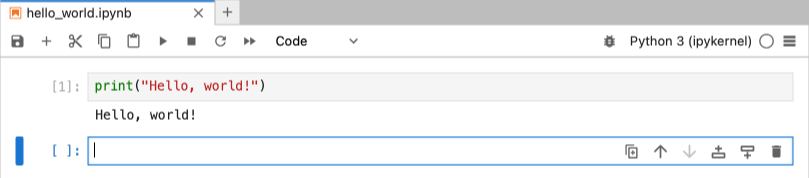
Select print and complete the "Hello, world!" example.
Press Shift + Enter to run the code:
4 - Ploting a sine wave
Here's how to create a sine wave plot using Altair, a library for interactive visualizations. Our main focus is to present JupyterLab's functionality, so don't worry about fully understanding the code just yet.
This code snippet will:
- Generate a sequence: Numbers from 0 to 10 with a step size of 0.1 for the x-axis.
- Calculate sine values: Compute the sine of each x-value for the y-axis.
- Create the plot: Display the data as a line chart to visualize the sine wave.
Paste this code into a JupyterLab cell and press Shift + Enter to run it:
import altair as alt

data = alt.sequence(0, 10, 0.1, as_='x')

alt.Chart(data).transform_calculate(
    y='sin(datum.x)'
).mark_line().encode(
    x='x:Q',
    y='y:Q',
)
Well done! You have taken your first steps in exploring how to run Python code.
Ready to build? Connect with me
If you found this exploration about Python valuable, let's keep the conversation going! I post deep dives into programming languages, security best practices, and the history of computing.
Subscribe to my blog for free to get notified when I publish new content.